Featured on: Craft Gossip
Months after completion we are finally going to start rolling out our various post on our craft room make over. If you remember back in October, I gave a sneak peak of the desk that Mr. Woodsy built.
Today, we are going to unveil the amazing (8 foot 3 inch tall) paper rack that Mr. Woodsy built for the craft room. Prior to the completion of the craft room I had boxes and boxes of paper, and most of the times I would go out and by new paper rather than sift through the endless boxes of paper. This was until I had an awesome storage solution. One of my goals with building the craft room was to have a paper storage area. I needed to be able to easily see all the paper I have. This is not going to be the most complete tutorial--more like a bare bones this is what you need to do to construct a paper rack kind of tutorial (since it's taken me months to get Mr. Woodsy to write a paragraph about how he built this monstrosity). If you have questions, please feel free to email us, and we will attempt to answer your questions! We did not find plans for this paper rack online. Mr. Woodsy drew them up himself and created this masterpiece himself!
I used ½" MDF to create the cabinet section, the size of my cabinet was 13” w x 13”d x 93” h. I then clamped the two pieces together to create one consistent board (so I could dado cut into the mdf so that the shelves can be removed if needed).
I took a scrap piece of MDF to practice my dado cuts prior to starting on the real thing.
I used scrap wood as my guide to keep straight lines. I spaced the shelves so I would get 2” spacings. Remember to account for the thickness of the shelves, I used a 5mm backing laun for my shelves. I dado cut the sides of the cabinet, so the shelves can be removed. I clamped both sides together measured down 3” for the face plate and 3” up for the kick plate.
Then I made marks every 2 ¼” put my straight edge across the sides and used my router with a ¼” upspiral bit to dado the ½” MDF to accomidate for the shelves. Each dado cut was ¼” in depth for the shelf to sit. *Remember to add a ½” to your 13” shelves.
After all the shelves are cut, just glue then nail the sides and top together. I also glued one of the center shelves to give the cabinet some support. Then added a 1/2" MDF board for the backing of the cabinet. (*Yes the paper rack went all the way up to our attics door!)
A close up picture of the rack prior to being painted.
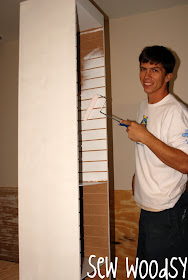
Since we wanted all the furniture built for the craft room white, we decided to paint the paper rack. I used a basic white water-based paint followed by a coat water-based semi-gloss polyacryclic finish. *I did 2 coats of both white and polyacrylic. You can roll the white paint on but in order to get a smooth finish you must brush the polyacrylic on.
Mr. Woodsy rolling on white paint.
Once the paint dried, move in your paper rack, and slide in all the shelves.
*These pictures were taken right after moving in the paper rack from the garage. Mr. Woodsy did not think I'd be able to fill the paper rack--I easily proved him wrong!
Every shelf is filled to the brim with paper and I'm now banned from buying any new paper!


Wow! This is the paper storage to beat all paper storage! I'd love me one of these,will need to speak to hubby about making one!
ReplyDeleteThanks for the tut!
Looks awesome! Great job Jon! Can't wait to have a craft space one day! : )
ReplyDeleteThe Mr. did an amazing job! Love it! Terrific tutorial, too. Thanks for sharing.
ReplyDeleteThis is very cool and I am very jelous and now you have given yourself away to Mr Woodsy and are no longer allowed to buy paper! LOL Enjoy your new shelving, you should be very proud, it really looks great!
ReplyDeleteVery impressive! That is such a cool paper tower!! Here from House of Hepworths.
ReplyDeleteSUPER FANTASTIC !!!!!!!!!!!!!!! LOVE IT LOVE IT LOVE IT !!!! YOUR A VEEEEEERY LUCKY GIRL !!
ReplyDeleteNaush
Hi. I am a new follower. Stopping by to invite you to join Thrifty Thursday, because your blog is great.. Have a wonderful day. Blessings!
ReplyDeleteJohnnie
Love it! This project was featured over at this week's Doggone Dirty Craftin link party. Come by and grab a button.
ReplyDeleteHi, Im ur new follower! I really loved ur blog.
ReplyDeleteDo check mine at http://aliascreativelife.blogspot.com/
OMG this is amazing! we are house shopping now and i am looking forward to moving from the garage to an actual craft room :) will have to flag this tutorial!!
ReplyDeleteVery Very Cool....
ReplyDeletegreat job. thats a nice piece to have for organization
ReplyDeleteJust curious- I would have to make a unit a touch smaller, but what did hubby think was the overall cost to make it?
ReplyDelete