A really good friend of mine gave me a beige on beige fabric bulletin board last summer. I knew I wanted it, but I also knew that the beige on beige was going to have to go! For months I looked for fabric, and thus I found this beautiful black and off white print. I scoured the ribbon aisles at Michaels Crafts and fell in love with this turquoise. Thankfully, Mr. Woodsy helped me with this project. I have the begining stages of arthritis in my hands, so gripping a nail gun is out of the question. I even have a difficult time using pliers without my hand cramping/freezing in place. It's sad and it stinks especially since I'm not even 30 yet! But I guess it's the facts of life. Thankfully, I have an amazing assistant to help with projects like these!
*A follower asked the question of how much fabric and ribbon did we use? I know for a fact it was less than a yard of fabric and less than one spool of ribbon. Wish I had the exact measurements, but I don't!
First you will want to lay your fabric out, pattern side down, and draw a "T" line.
Line up your old bulletin board with your "T" line.
Cut around the old bulletin board.

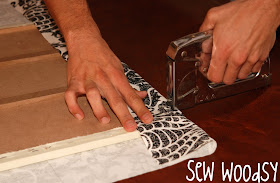
Tightly, wrap one side and begin stapling.
Repeat with the stapling--pulling the fabric tightly, so that there are no loose ends.
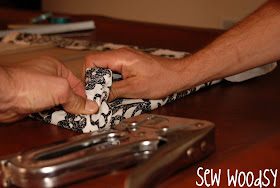
For the corners you will want to tightly gather the corners.
Hold your thumb near the area you want to staple.
... And staple!
Then cut off the excess ribbon. (*I have to comment how much I love Mr. Woodsy... not only did he help me re-cover this board he uses pink scissors without any hesitation!)
Next, you will start with one end of the ribbon and wrap it on the back of the board, followed by one staple!
Here is another picture of how it looks when you first start your ribbon.
After you secure one side of the ribbon, wrap it diagonally across the board, and staple it. Cut the ribbon and repeat on the opposite side, so that you'll have an "X".
We drew a diagram prior to unwrapping the ribbon off the old board, so that we could follow it for the new board.
Now, this is where the challenging part comes in to play... start in the center of the board. Secure the ribbon, bring to the middle of the board (so that a smaller "X" will appear), staple it in place...
... then loop the ribbon around, so that you can bring it down to form another smaller "X". Repeat this until all four corners have been completed.

Once the ribbon is secured, you will want to place a staple in the center of each of the "X's".
Make sure that when you staple the ribbon you do this on a surface that can be damaged if necessary. Our staples were a bit long, so they went right through the board. Mr. Woodsy used pliers to fold the staples down.
Next, you will want to work on the buttons for the board.
Next, you will want to use pliers to snap the backs off the buttons.
Backs have been removed from the buttons!
Heat up your hot glue gun and get ready to start glueing your buttons on to the staples/ribbon.
Place a small amount of glue on the center of the button.
Press firmly on the button to secure it.
Repeat until all button have been secured into place.
I flipped the board over and applied a little hot glue to the edge of the fabric. In some cases the fabric was a little loose. I tightened it up by placing a thin line of hot glue on the edge. I then used my handy-dandy hot glue gun helper thimble to smooth out the glue. *no hot glue gun burns here*
Lastly, it's time to hang up this amazing little revamp project!
Make sure it's level...
Voila!
My laundry room is looking a little more complete... now on to find a new rug!


this is sooo cute!! what a good idea! love the teal and the B&W fabric together. adorable!!!
ReplyDeleteI'd love for you to link this up to my new link party, Your Whims Wednesday! http://mygirlishwhims.blogspot.com/2011/04/your-whims-wednesday-1.html
Nice! And yay for a willing hubby!
ReplyDeletePretty! Loving the color combo and it looks great next to your sign. Your laundry room is going to to be the most gorgeous one ever!
ReplyDeleteI just found your blog and am your newest follower. Thanks for creating such an amazing blog full of inspiration. I'll be back often (and I LOVE the bulletin board)!
ReplyDeleteI love the color pallete here. This is so beautiful and looks wonderful in the wash room I love it
ReplyDeleteFantastic directions! Love the ribbon color. Fun blog design and name. Visiting from Show and Tell at Blue Cricket.
ReplyDelete~Kimberlee
{$15 Amazon GC Giveaway}
So cute, I totally have TWO of those beige on beige boards and they are laying under my bed because I haven't known what to do with them. I am totally gonna do this! Thanks for the inspiration!
ReplyDeleteThis turned out great! I love a good transformation. I made one of these about a year ago, and it's so handy for keeping important things front and center.
ReplyDeleteSorry to hear about your hands; have you looked into chondroitin? I just turned 50, and it's kept my arthritis, which I've had since about 17, from stopping my movement.
Just wondering how much fabric and ribbon you needed. Thinking of doing one myself...thanks
ReplyDeleteYour tute skills are GREAT! I really like the white/black mixed with the teal, its got some great snap! Thank you so much for posting at the Beagle.
ReplyDelete@Just Me--I tried emailing you but your email address is not set up to your account. We used less than 1 yard of fabric and less than 1 spool of ribbon. Unfortunately, I'm not sure the exact amounts. We just eyeballed it and went from there!
ReplyDeleteYour tute skills are GREAT! I really like the white/black mixed with the teal, its got some great snap! Thank you so much for posting at the Beagle.
ReplyDeleteI love the color pallete here. This is so beautiful and looks wonderful in the wash room I love it
ReplyDelete